How to Shoot Killer Product Photography with Your iPhone
If you're behind the iPhone camera and feeling frustrated with your product photography skills, don't sweat it. You're not alone. iPhone product photography can be tricky, but it doesn't have to be. I’m here to give you a few simple tips so that you can up your iPhone product photography game and start taking killer shots. Before you know it, you’ll see a boost in your sales and you’ll notice tons more double-taps on social media.

First things first: invest in some good backdrops. iPhone cameras are great, but they can't do everything. A good backdrop will make your products pop and give your photos a professional look. If you're selling on platforms like Etsy or Amazon, investing in some good-quality backdrops is a must.
So, what is product photography?

The key to successful product photography is to make the product look its best. This means paying attention to details like lighting and composition and taking the time to edit your photos for maximum impact. With a little practice, anyone can start taking beautiful product photos with their iPhone.
The many different types of product photography you can shoot with iPhone
There are many different types of product photography, and iPhone photographers have been able to create some stunning examples of each. Here are just a few of the most popular types of product photography:

White background product photography: I know you’ve seen this type of photography — it's standard on many e-commerce sites. You can shoot on white or use apps that will edit your photos so they have a seamless white background with the focus solely on your product.

Food photography: iPhone photographers have a particular talent for making food look irresistible. Whether it's a drool-worthy shot of a juicy steak or a perfectly composed still life of fruit and yogurt, iPhone food photos are sure to make your mouth water.

Macro photography: Macro photography is all about capturing close-up shots of small subjects. The latest few models of iPhone's camera systems are great for this, as it allows you to get sharp focus within inches of your subject

Flat lay photography: This is a great option for products that are small or have intricate details or for showing all the ingredients or steps in a recipe. By photographing them from above, you can really show off all the different features.

Lifestyle photography: This type of photography is all about making the product look appealing in a real-world setting. It's great for things like clothing, cosmetics, and home decor.
Can you really get professional results with an iPhone?
 Despite what some people may think, you can absolutely get professional-looking results when taking product photographs with an iPhone. Of course, there are a few things you'll need to keep in mind in order to get the best possible shots.
First, be sure to use the iPhone's built-in camera app rather than a third-party app, as this will give you the most control over your settings. And second, paying attention to lighting is essential - try to avoid direct sunlight or harsh artificial light, and instead look for soft, natural light or diffused lighting.
If you keep these things in mind and use the tips I’ll teach you in this article, you'll be well on your way to taking beautiful, professional-looking product photos with your iPhone.
Equipment you'll need for taking product photography with your iPhone
- Compact tripod- always put your iPhone on a tripod to get the sharpest photos
- Reflector - fill in shadows and control light with a reflector
- Backdrops - take a photo from a basic snapshot to a pro-level photograph by using gorgeous backdrops to set the scene for your product
- Black reflector (black poster board works, too) - control reflections when photographing glass or metal by blocking unwanted reflections with a black reflector
Do I need to buy lighting for iPhone photography?
"To light or not to light?" That is the question. This truly depends on the amount of natural (outside) light available to you in your home and the time of day that you'll most often be shooting. Don't rely on the artificial light in your home — it too often casts a warm tone on photos, which is nice and cozy in our homes, but doesn't look great in product photography.
I often use artificial lighting because I do most of my shooting when it's dark outside. (Hello, fellow night owls!) It gives a consistent look to all of my images, no matter what time of day I happen to shoot. That said, when natural light is available, it is much easier to shoot with. There are pros and cons to both options in lighting, so the choice is truly a matter of preference.
Natural lighting:
Take your photos near a sunny window, but not in direct sunlight. If the sunlight is filtered through sheer white curtains or blinds, the lighting should be perfect. Or, if it's a cloudy day but still bright outside, open the blinds or curtains completely to allow the filtered light to flood the room.

The biggest pro of using natural lighting is that it's free! You don't need any special equipment or setups, just set up near a window and let the light pour in. Natural light is also very flattering, giving products a warm and inviting glow.
However, there are some negatives to using natural light as well. The biggest downside is that it can be very unpredictable, especially if you live in an area with lots of trees or buildings that block the sun. Another downside is that natural light can change throughout the day and you're at the mercy of Mother Nature.
Artificial photography lighting:
If you want complete control over the light, artificial lighting is the way to go. This could be anything from a ring light to a simple lamp with a white bulb. The benefit of using artificial lighting is that you can set it up once and leave it there, knowing that you'll always have the same level of light, no matter what time of day it is. Another pro is that you're not limited by the amount of natural light available, so you can shoot product photos anytime, day or night.
The downside to artificial lighting is that it can be expensive, depending on what kind of setup you want. Another downside is that it can cast a tone on your photos if you're not using the right kind of light bulbs.
For iPhone photos, I use a LitraTorch 2.0 for small, up-close photos and an LED light wand for larger items and scenes. There are endless options when it comes to iPhone photography lighting. Just choose something with a continuous light, not a flash. And, choose lights that can be adjusted for brightness. Additionally, if you plan to use artificial lighting, be sure you also get a diffuser to soften the light.
What about external iPhone lenses?
No matter how good the iPhone camera is, there are always going to be situations where you need a little bit of extra help. That's where external iPhone lenses come in. While they're not usually necessary, they can be very useful if you're shooting close-up products like jewelry or tiny details. The top-rated external macro lens on the market is made by Moment, but the Xenvo clip-on lens is a fantastic budget option. Most of the time, however, you don't need an external lens.
How to take iPhone product photography
You don't need to be a professional photographer to take great photos. You know your product better than anyone — so use that knowledge when setting up your photoshoot! Let's go through an iPhone product photography photoshoot step-by-step, and you'll see just how easy it really is!
Building a product photography set
 Building a great set is incredibly easy with Drop/A Wall vinyl backdrops and boards. Today, I'm using their 23"x23" Premium Board Backdrops. I'll use the Turkish Marble as my counter and Farmhouse Wood as my wall. The boards, when photographed, look exactly like the real thing but with the benefit of being lightweight, portable, non-glare, and cost-effective. Plus, you can easily store them out of the way when you're not using them. (You can’t do that with a slab of genuine Turkish marble!)
To shoot a flat lay image, you can just use one board by itself. However, since I intend to shoot both the counter and the wall, I'll build my set using the brackets provided by Drop/A Wall.
You’re almost ready to start shooting. But first, here are some tips to help get you started:
13 Tips for setting up a winning product photography shoot with your iPhone
Tip 1: Clean your product.
Check your product (and your set) for fingerprints, dust, scratches, loose stitches, and anything that's out of place. Fix it now, so you don't have to touch up your photo later.
While you're at it, make sure your iPhone's camera lenses are clean, too.
Tip 2: Use a tripod.
As tempting as it is to just snap the photo and be done with it, your photos will be sharper if you put your iPhone on a tripod. It is worth the extra few seconds it will take. Besides, if you're taking several photos, you'll appreciate the consistency between your shots because your photos will all be taken from exactly the same spot.
Tip 3: Take inspiration from brands with photos you love.
There's no point in reinventing the wheel! When you see product photos you love, save them into an album of images that inspire you. Then, when it's time to shoot your own photos, refer back to them and ask yourself how you can use a similar technique or style with your own product. Don't copy the photo, but use it as a jumping-off point.
Tip 4: Learn the rules of composition.

There are far too many rules of composition to list here, but the easiest one to remember is the rule of thirds. It is one of the most basic principles of composition in photography, and yet it's also one of the most important. Simply put, the rule of thirds is a way of dividing up an image into thirds, both horizontally and vertically. The idea is that by placing your subject off-center, you can create a more visually interesting and dynamic composition.
But the rule of thirds is about more than just aesthetics — it's also a useful tool for helping you to compose your shots more effectively. And, your iPhone makes it really easy to compose with the rule of thirds. They already divide your screen into thirds horizontally and vertically when you have the grid turned on.
So, rather than merely centering your product in every shot, try composing your photos using the rule of thirds, too. That means lining the important parts of your photo (in this case, your product) up with the intersections of the grid lines.
See how I used the rule of thirds to compose the image by lining up the product with the iPhone’s built-in grid lines.
Note: By default, your grid should be on, but if it isn't, you can enable the grid in Settings > Camera > enable Grid
Tip 5: Use props to compliment your product.
When it comes to product photography, props can be your best friend. A few strategically placed items can help to draw the eye, provide context, and add a touch of personality. For example, if you're selling a book, placing it next to a coffee mug and a pair of glasses can give the shot a cozy, inviting feeling. Or if you're selling a piece of jewelry, draping it over a Velvet cloth can add a touch of luxury.
Ultimately, the right props can help to make your product more relatable and engaging. Just be sure that your props complement your product and don't take away from it. With a little creativity, you can take your product photography to the next level with the help of some well-chosen props.

Tip 6: Be consistent.
It's so important to develop a consistent style with your product photography. Whether you're cropping your photos in a certain way, using specific lighting techniques, or even incorporating props, by being consistent, you'll be able to create a recognizable style that will set your photos apart from the rest. And if you're selling online or building a brand, having the same look and feel across all of your images will go a long way in giving your products a professional, signature look.
Tip 7: Take multiple shots from multiple angles
You might only plan to publish one photograph, but the beauty of digital photography is that you can take as many photographs as you want. Most of us don't luck out and nail it on the first frame (or even the second, for that matter!) Sometimes you'll have a shot in your head and will find out through experimentation that a different angle was even better. It doesn't cost anything to tap the shutter button a few more times. Take shots from far away, up close, and on every side.
Tip 8: Try some flat lay shots for social media
Flat lay photos may not be what you need for your e-comm store, but they're extremely popular on social media. When you're finished with your photoshoot but still have everything out, why not shoot a flat lay for Insta?
Tip 9: Play around with reflections
Some products look great when shot with reflections, including cosmetics, beauty products, jewelry, liquor, and shoes. You can achieve a soft reflection by putting your product on a piece of plexiglass or use a mirror to get a crisp reflection. You can find mirrors and plexiglass at any big box craft store.
Tip 10: Remember what NOT to do.
Here are three things you need to remember NOT to do when shooting product photography with your iPhone:
- Don't use digital zoom. As tempting as it is, image quality deteriorates quickly when you do that. Instead, move your phone closer to the product if you need to zoom in.
- Don't use the flash. You won't get professional quality results if you use your flash. Turn it off and use either natural light or artificial lighting.
- Don't use filters. Yes, photo filters are fun. (Who doesn't love the longer lashes they give us on Snapchat?) But the purpose of product photography is to accurately represent your product, not change the lighting with filters.
Tip 11: Use a reflector if you need more natural light.
Remember to set up your backdrop near a brightly lit window if you're using natural light for your photo. Have your product face the light. If you need more light, use your reflector opposite the window to bounce light back onto your product to light it from the other side.

Below, the image on the left shows the bottles without the reflector, the image on the right was taken with the reflector. See how much light it bounces back onto the bottles?

Tip 12: Always use a diffuser with artificial lighting.
A diffuser helps to soften the light and reduce harsh shadows, creating a more flattering and natural look. In addition, a diffuser can help to reduce glare. And because they distribute light more evenly, diffusers can help to reduce the risk of hot spots and uneven lighting. If you don't have one, a sheer white curtain makes a great diffuser in a pinch!
Tip 13: When photographing short or small items, flip your iPhone upside-down.
Flipping your phone upside-down will get the lens lower and allow you to shoot your product straight on, rather than shooting down at an angle. That is one of the hallmarks that separates professional photography from amateur snapshots. You always want to be at eye level with your product.

It's easy to take iPhone product photos
If you've got your product set up and lit the way you want it, you're ready to start taking photos. You don't need to worry about ISO and f-stop here — iPhone makes it really simple for you. (You can adjust those manually if you want to, but that's a topic for another day!)
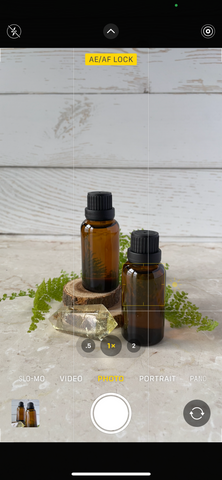
First, with your phone on the tripod, compose your shot. Remember to use the rule of thirds and try to line your product up with the intersection points on the grid that's showing on your screen. When you're happy with it, press and hold the screen where you want the iPhone to focus. This will set the AE/AF (autofocus and auto exposure) and lock it in place. To confirm it's locked, you should see a yellow square on the screen where your finger was pressed and a bar at the top of your screen that says "AE/AF LOCK."
Next, you'll notice a small icon of the sun to the right of that yellow square. You can slide that up or down to adjust the exposure. Sliding your finger up will increase the exposure, making your image brighter. Sliding your finger down will lower the exposure, darkening the image.
Remember to recompose your shot and take multiple photos from different angles, close up, and far away. Take as many photos as you want — you can always delete the ones you don’t like.
How to edit your iPhone product photography
Remember, with product photography, the idea is to accurately represent your product. However, your photos should be edited to some degree. Almost all professional photographers edit their photos, even if it’s just to crop them and sharpen them for printing.
There are a number of iPhone photo editing apps you can use, like Adobe Lightroom and Snapseed. Of course, you can export to your computer and edit there if you prefer.
The object is to get your photos as close to perfect as you can "in camera" so that you only have to make very basic edits like cropping, increasing sharpness, and boosting the overall brightness of your images to achieve the look you want.
Here is my image, before editing in Lightroom for iPhone:

As you can see, it’s a bit dark and needs to be cropped. Fortunately, these are both very easy to do with Lightroom (or any other editing app for that matter). You can see screen captures as I cropped, sharpened, and brightened the photo to my taste.

And here is the final result. That was easy!

Final thoughts about iPhone product photography
With its powerful built-in camera and wide range of editing apps, it's easy to get professional-looking results with your iPhone. And with a little practice, you can even start to experiment with more creative shots. So if you're ready to take your photos to the next level, use these tips, grab your iPhone, and get started! You might be surprised at just how good your product photos can look.
And when it comes to backdrops for your product photos, Drop/A Wall has you covered. With a massive variety of options to choose from, they have the perfect backdrop for any product. Plus, their backdrops are easy to set up and take down, so you can get the perfect shot every time. If you're looking for the perfect way to make your product photos stand out, head over to Drop/A Wall and check out their selection of board backdrops today.
So there you have it — a few tips and tricks to help you take amazing pro-level product photos with your iPhone. You'll be shooting like a pro in no time!
Brooke Arnold is a writer and award-winning photographer specializing in commercial product photography and cat portraits. She is an advocate for rescue animals and is best known for dressing up her cats as famous people like Bob Ross and Evel Knievel.
Nice blog
Leave a comment